13 May Replacing Leaking Pushrod Tubes
Replacing Leaking Pushrod Tubes Seals
Oil leaks can be one of the most frustrating aspects of owning an older car. Sadly, our beloved vintage Volkswagens are not excluded from this affliction. The old joke is that the only time an old VW doesn’t leak is when it has run out of oil. But it doesn’t have to be this way. Generally speaking, the weak spots (in terms of leaks) on the vintage aircooled VW engine are the main and flywheel seals, and to a lesser extent, the pushrod tubes seals. While the engine needs to be removed to replace the main and flywheel seals, the pushrod tube seals can thankfully be replaced with the engine in the car.
Replaceable Pushrod Tubes
In the early days, replacing leaking pushrod tube seals involved removing the engine, removing the cylinder head(s), removing the pushrods and tubes and replacing the seals. The off road community, however, developed an easier solution. Off road racers/hobbyists would often damage pushrod tubes and pushrods due to debris, which would effectively leave them out of the race, or worse, stranded in the desert. This problem caused the development of spring-loaded, two-piece pushrod tubes that could replace damaged ones with the engine in the car.
Early versions were two-piece tubes, with one tube slightly smaller than the other in order to fit inside the larger tube. A spring kept tension on the two tubes, pushing each tube half outwards in order to keep pressure on the pushrod tube seals, reducing the chance of further leaks. The problem with this version was that they were often made of thick plastic, which didn’t hold up well over time due to the high heat created by the cylinders and heads. They would eventually warp, causing leaks down the road. When I worked in a VW shop many years ago, we used to call these “get you home” tubes, recognizing that their lifespan was limited.
A second version emerged that consisted of two pieces of aluminium, similarly designed with one side slightly smaller than the other in order to fit inside the larger tube. While their aluminium construction addressed the problem of deforming plastic, these units did not have a spring keeping tension on the seals. The most common design had a nut that was turned (once installed) in order to increase the width until tension was created on the pushrod tube seals. The problem with this design was that it did not take into account the fact that, being aircooled, VW engines expand as they warm up. This led to leaks around the seals once the engine was hot. If you adjusted the nut to make the tube wider (once the engine was hot), it would inevitably damage the seals when the engine was cold (and contracted) causing too much pressure on the seals, leading to leaks.
The answer, of course, was a marriage of both designs; a replaceable pushrod tube made of aluminium (which would last) that was spring-loaded (so it could expand and contract with the engine).
Getting Down to Work
Replacing the pushrod tubes and seals is not complex or time consuming; if you can adjust your valves, you can replace your pushrod tubes and seals. Plan approximately 2 hours per engine side, which includes changing the oil (while you’re in there) and taking time to clean everything well. The replaceable pushrod tubes used are made by JayCee, and were purchased through CB Performance (part #1515). After speaking with several people and surfing the popular Internet forums, the JayCee units were strongly recommended. Each kit from CB Performance comes with eight adjustable pushrod tubes and 16 new pushrod tube seals. The replacement tubes are designed for 1600 cc and up engines, and are made wide enough to provide pushrod clearance when using high-lift ratio rockers and larger cams.
To begin the job, the underside of the engine was degreased to remove the oil residue resulting from the leaking seals. On this engine, only two pushrod tube seals were leaking on the passenger-side (pistons #1 and 2) of the engine, which made life easier as we did not need to replace the tubes and seals on the other side of the engine (pistons #3 and 4). We still elected to replace all 4 pushrod tubes and seals on the #1 and 2 side, however, both for preventative maintenance and because it makes installing the replacement tubes easier. The reason for this is that the tubes have to be installed at an angle – especially if you are using heater boxes – and failing to remove all 4 tubes would make installation much more difficult.
The process is straightforward: remove the valve cover, unbolt the rocker arms, and remove the pushrods and pushrod tubes. Thoroughly clean the case and cylinder head (where the seals contact), install the replacement tubes and new seals, followed by the pushrods and rocker arms. Don’t forget to adjust your valves, add fresh oil and reinstall the valve cover. You may also want to replace your valve cover seal if it is brittle and/or leaking.
A few points worth noting:
1. When installing the replacement pushrod tubes and seals, it’s easiest if you start with the furthest pushrod tube, working your way backwards. In other words, if you are lying underneath the engine, start with the tube that is closest to the front of the car, the #1 cylinder exhaust pushrod tube. You then move to next closest tube, the #1 intake pushrod tube, followed by the #2 intake pushrod tube, and finally the #2 exhaust pushrod tube.
2. As noted, if you have heater boxes, installation can be tricky, as you have to compress the pushrod tube considerably to get it past the wide heater box shell. This can be a challenge due to the amount of spring tension created on the tubes. Our best results were achieved by first placing the spring side of the tube into its hole on the case side, compressing it with your hands, and getting it past the heater box shell on an angle (with the outside of the pushrod tube angled towards the back of the car). It took a few tries – your hands will be tired afterwards – and we had to redo a couple of them because we weren’t happy with how the tube seals sat once the tube was installed. It’s critical that the pushrod tube seals lay flat against the case and head in order to prevent leaks.
3. The issue of weather to use sealant on the pushrod tube seals is a controversial one. Critics of this practice point out that VW never used sealant on their pushrod tube seals when installing them at the factory. I suspect that this had more to do with cost and engine assembly time than anything else. If you do use sealant (a practice I prefer), use only a small amount (a thin film) on the front, back and inside of the seals, and make sure that you only use a non-hardening type. If you use a hardening type, you will restrict the seals ability to remain pliable and move when the engine expands and contracts. Regardless of which approach you use, ensure that everything is spotless before you install them.
Follow along with the photos as we walk you through replacement of the pushrod tubes and seals. After a couple of hours, and $100 (U.S., including shipping) less in my pocket, the job was done. The engine pictured had its pushrod tubes and seals replaced in the summer of 2007, and I’m happy report that everything remains leak free.


Photo Captions
1. What a mess! Leaks at the seals of two pushrod tubes were hitting the passenger side of the header and muffler, creating an instant “James Bond smokescreen” effect, annoying those following even more than the car’s owner.
2. Begin by removing the factory pushrod tube protectors. These not only protect the pushrod tubes from damage, but also help to properly distribute the cooling air from the fan.
3. Remove the valve cover by pulling down on the bail. An old factory-trained VW mechanic told me years ago that they were taught to use an old rag to do this, which prevented damage to the valve cover caused by using a screw driver to pry on the bail.
4. Remove the two 13mm nuts that hold the rocker arm on, allowing you to remove the rocker arm assembly. It’s easiest to back off all valve adjusters before removing the rocker arm. When reinstalling the rocker arm, alternately torque the two 13mm rocker arm retainer nuts up to 18 ft./lbs, followed by adjusting the valves.
5. Remove all 4 pushrods. Note the use of excess sealant in an attempt reduce the leaks. Needless to say, this Band Aid approach did not work.
6. It’s very important to label everything, as pushrods can take a “set” and need to be returned to their original locations.
7. Using a 13mm socket, remove the bolt that secures the factory thermostat to its bracket. This will allow access to the pushrod tubes.
8. Don’t forget to also remove the 13mm nut on the side of the case, which is used to both locate the thermostat bracket and to adjust the thermostat. You can then twist the thermostat off of the thermostat rod. When reinstalling the thermostat, screw it back onto the thermostat rod, and loosely install the thermostat bracket to the side of the engine case with the 13mm nut. Push up on the thermostat until it will not travel further, indicating that the cooling flaps are fully opened. Slowly lower the thermostat bracket until it lightly touches the top of the thermostat with the thermostat in the fully raised position. Tighten the 13mm nut that secures the bracket to the side of the case, followed by installing the 13mm bolt that secures the thermostat to the thermostat bracket. As you tighten the bolt, the thermostat will be pulled down, closing the cooling flaps.
9. After ensuring that ALL of the pushrods have been removed, the pushrod tubes are removed by simply compressing them in the middle with pliers and twisting them out.
10. This, in effect, shortens the tubes and makes them easy to remove.
11. An exploded view of the replacement pushrod tubes. The kit comes with everything you’ll need, including new pushrod tube seals. Note the two o-ring seals in the centre, which fit in two ridges on the end of the smaller tube (on the left), preventing leaks from occurring between the two tubes.
12. This is how the assembled pushrod tube should look. Note that the spring side is installed towards the engine case. The washer goes behind the seal on the right, providing support for the seal against the cylinder head.
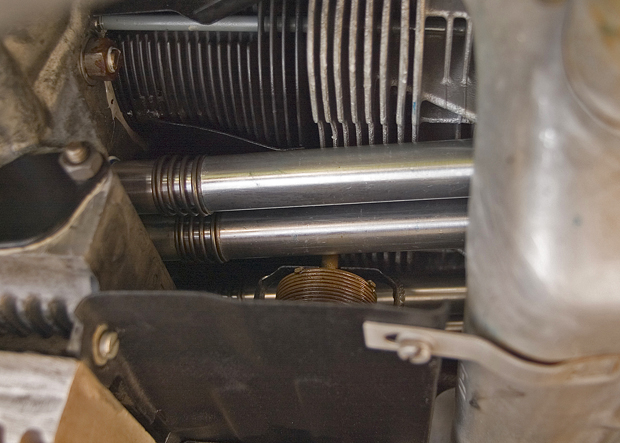
13. The finished product. Note again how the spring-side faces the engine case. Replaced in 2007, they remain leak free!
