25 Oct Porsche 356 Wheel Restoration, Part V
I mentioned earlier in this series that I intended to run a set of Porsche 356 Carrera wheel spacers on the rear wheels, primarily for a cool and different look, but also to increase the rear track in order to fill the fender well and increase stability in cornering.
Background
While there has been a lot of speculation as to the reasons that Porsche installed aluminum wheel spacers on the back wheels of early 356 Carreras – to improve brake cooling, etc. – the reason they used them was to simply compensate for the increased front track width (from 40 mm to 60 mm) of the new front drums used on Carreras. It was a simple solution. Using individual aluminum wheel spacers was a lighter solution than producing a large wheel spacer disk, which are commonly encountered with modern wheel spacers.
Specifications
But what were the specs? After talking to a number of 356 guys – I wanted them to match the originals – I had a set made (thanks Scoop!) to the following dimensions:
Diameter = 45mm
Thickness = 20mm
Inner bore = 15mm
Outer bore = 18mm (cut to 5mm depth both sides with 18mm x 30 degree countersink cutter)
![]()
There is one deviation from the factory that is important to note: my inner bores are smooth, not threaded like the originals. The speculation is that the originals were threaded onto the stud in order to keep them in place during quick tire changes at the track. Maybe so, but I didn’t like the idea of my wheel spacers potentially interfering with the wheel torque or seating, so mine were made smooth on the inner bore. They fit snugly over the stud.
![]()
Studs or Bolts?
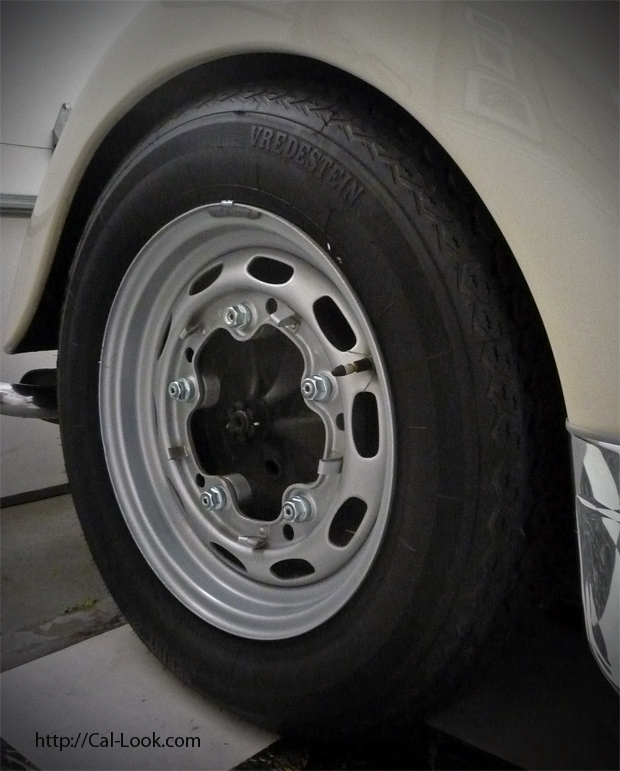
I tried many different combinations of longer wheel bolts, but didn’t like the look of them; it didn’t look “period correct,” as most cars ran longer studs and lug nuts, so I went that route instead.

The lugs are Porsche style, ball seat, 12 mm x 1.5 mm, with a 19 mm socket size. The studs are 12 mm x 1.5 mm x 57 mm (2.25″), end-to-end.
You will note that I chose to use screw-in studs vs. press-in studs. While there is no doubt that press-in studs are safer, the problem is that they essentially ruin the drum if you ever want to convert back to stock lug bolts. This is because the press-in studs are hammered in from the back of the drum, and destroy the threads as they grip the lug bolt drum bore. My philosophy is to “do no harm” to my car, using only bolt-on parts, so that design was a non-starter.
Another factor is that these are the original VW drums that were delivered on the car new, and most aftermarket drums are complete crap, eventually stripping out the splines where the drum goes over the axle, inevitably leaving you stranded on the side of the road. Ask me how I know. Better yet, ask others how they know too.
The studs were therefore screwed in using Loctite thread locker, and I painted white dashes on the end of the studs so I can monitor if they are backing out. They haven’t moved a millimeter yet, and while I will continue to monitor them, I’m not worried, as most car’s wheels are held on with threaded bolts anyway.
The Final Result
I’m very happy with the result, as they look cool and fill out the fender well nicely. The car drives smoothly, with no vibrations, and tracks straight. And I swear that the rear end feels more securely planted in tight corners – always helpful with a swing axle – but that might be in my head. Bruce Tweddle on the Cal-Look Forum pointed out that by moving the wheels our further, I’ve effectively lowered the rear a small amount, which may also impact what I’m feeling. Maybe so.

All that’s left to do is to paint the lug nuts black.
The car is running Vredestein Sprint Classic 165 radials, at stock ride height, on stock 1967 long axles.
Restoring and installing these wheels has been a fun project, and I’m very happy with how they came out. I hope that this series has been helpful for others considering restoring a set of Porsche 356 (or other) wheels.
