08 May Adding Bump to Your Stick and Squish to Your Dish Part IV
 In Part I of our high performance engine building series, we looked at the process of tearing down an engine and some of the things to keep in mind along the way. In Part II, we looked at the process of inspecting and machining engine parts. In Part III, we looked at the process of assembling the engine. We will wrap-up this series by discussing some of the ancillary components and finally get to drive it!
Bringing it Home
 Shipping an engine cross-country is not cheap. I was able to save some money by using a freight company that only ships to airports. While it is less convenient than having the long block shipped directly to your house, the shipping savings in going to pick it up from the airport was worth the extra hassle. Unless your machinist or engine builder is local, be sure to investigate shipping options in your area prior to commencing with a project like this, and factor the cost into your budget.
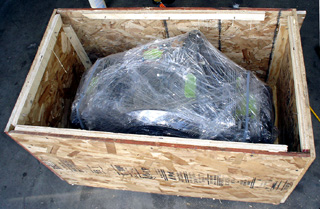
Few things are more exciting than to open up a crate and find your spotless, 2110 c.c. long block ready to go (refer to photo #2). As noted in Part III of this series, Art Thraen at Air Cooled Engineering ran the engine for 7 minutes prior to shipment, breaking-in the cam, monitoring head and oil temperatures, and looking for oil leaks. The oil was then drained and inspected. This process removes a lot of the fear involved in running-in new engines, as the builder has already done so prior to shipping.
 After the engine arrived, the original 1700 KEP pressure plate was installed with a new stock un-sprung Fitchel and Sachs disc. While the long block was at Aircooled Engineering, the original VW doghouse cooling tin was sent out for powder coating, and the Berg 1.5″ merged heaterbox/header system was sent out for ceramic coating. The results were excellent, and the paint is much more durable than if they were simply painted via conventional means.
As the engine will see duty in everything from hot summers to cold winters, all of the stock VW tin was used, including the thermostat and pushrod tube protector/lower cylinder cooling tin. This will ensure rapid warm-up in cold weather, resulting in less cylinder wear and better heat. The VW heaterbox system relies on a hot exhaust pipe inside the heaterbox shell, so anything you can do to quickly bring the temperature up will help. Even if you do not plan to run heaterboxes, but still want to run the thermostat, it’s important to note that most large-diameter headers do not permit the use of a thermostat as the #1 and 3 exhaust pipes run closer to the crankcase.
Cooling
 The factory doghouse oil cooler was installed with 4 new seals. In order to keep engine temperatures in check, additional cooling air was brought into the engine bay via a VW 2-inch fan shroud-to-heaterbox hose, which runs from inside the right rear shock lower mount, traveling upward and above the starter, through a 2-inch hole next to the starter in the front breast plate. The hose end is then angled at the fan, which draws in ambient temperature air at high pressure to help cool the cylinder heads and oil cooler. This set-up worked perfectly with the prior combination, although the engine will be monitored to see if an auxiliary oil cooler will be needed due to the expected higher temperatures brought on by the use of dual valve springs and higher compression.
Your cooling needs will depend on your climate. Do you live in a hot, desert-like climate? Does your deck lid have louvers to draw in cooling air? Is the engine going into a heavy Type II? These are all important considerations, and new engine combinations need to be carefully monitored. If your engine does require an auxiliary oil cooler, be sure to run an inline thermostat that bypasses the additional oil cooler until the oil reaches operating temperature. Failure to do so will result in sludge and condensation build-up inside the engine due to the oil running too cool.
Ignition
The engine will be placed into a European 6 volt ’67. A Tiger 6 volt CDI ignition is mounted under the rear seat, and used in conjunction with a Bosch blue coil and restored Bosch 010 distributor (courtesy of Glenn Ring) with NOS cap (refer to photo #3). Bosch ignition wires were installed along with a new set of NGK BCPR5ES spark plugs, which are a stock heat range spark plug with ¾” threads. The advantage to these plugs is that they only require a 5/8″ spark plug socket (versus the larger stock 13/16″ socket size), which is a real asset when trying to install or remove spark plugs with dual carburetors. Timing will be set using a period Santana pulley (refer to photo #4).
Induction
 If you’re into traditional Cal-Look engines, there is only one carburetor choice, the mighty 48 IDA Weber! In order to improve their street-friendly manners, however, these vintage racing carburetors were rebuilt by Art 7 years ago, which included adding a third progression hole and modifying the idle jet holder to aid in the transition from the idle circuit to the main circuit. The carburetors are mounted on original Deano Dyno Saur (DDS) manifolds, which were also powder coated in the correct early DDS purple.
While IDAs are thing of beauty, with their large, polished velocity stacks, rapid ring and cylinder wear will result if you don’t use air filters. In order to prevent this, Unifilter foam filter socks are used on the street, consisting of an oiled foam cylinder around a coil, which prevents the filter from being sucked down the carburetor (refer to photo #5). 4 filters are needed, and they are attached by simply clamping them to each of the 4 velocity stacks. In order to provide room for fuel standoff, it’s important to clamp them as high up the velocity stack as possible, so that the top of the filter is above the top of the of the velocity stack. In addition to ring and cylinder wear, if you are running large-bore heaterboxes, failure to run air filters will result in a strong fuel smell inside the car when the heat is on during full throttle runs due to the fuel standoff that occurs above the velocity stacks getting sucked into the intake fan, and subsequently the heater boxes.
The IDAs are operated via an early Berg linkage. Once installed, and with the engine off, the carburetors were checked to ensure that each carburetor was opening the same amount at partial, mid, and full throttle. Adjustments are made by lengthening or shortening linkage arm length through the supplied adjustment nuts. Once running, final carburetor synchronization is checked with a synchrometer tool, which compares vacuum in each carburetor throat.
Fire in the Hole!
Prior to installing the engine in the car, fresh oil and a filter were installed, the rocker arms and spark plugs were removed and the engine was cranked for oil pressure with a remote starter. As mentioned in Part III of this series, this provides full lubrication prior to initially firing the engine. Although removing the rocker arms was not needed in this case due to the fact that the engine had already been run on an engine stand for 7 minutes, it is required if this is the first time you’ve started the engine. Removing the rocker arms ensures that the lifters don’t wipe the break-in lube off of the cam, potentially damaging the lifters and cam upon start up.
 The rocker arms were then installed and the valves were adjusted (.006″ cold with heavy duty aluminum pushrods). The engine was then installed into the car, followed by the carburetors, exhaust and rear breastplate. The distributor was statically timed, and after connecting the appropriate wires and fuel lines, the car immediately started. Revs were kept between 2,000 and 2,500 RPM for an additional 10 minutes in order to ensure the cam was fully broken-in. The carburetors were then checked with the synchrometer tool, the ignition timing was set at 28 degrees (total advance), and a final leak check was completed. It was time to drive the car!
For the first few kilometers, prolonged idling was avoided in order to ensure good oil pressure. The goal now was to break-in the rings. The first few kilometers are your best window of opportunity to break-in new piston rings and freshly honed cylinders. Driving was done at medium load (1/2-to-3/4 throttle), varying the RPMs, including decelerating from 1/2-to-3/4 throttle by quickly removing your foot from the gas pedal. The car was then driven to a medium-grade hill to increase the load, and the same technique was applied going up and down the hill several times. The car was then driven normally. After 300 kms, the engine oil was changed and the valves were adjusted.
Driving Impressions
The new engine combination is an absolute blast to drive! It has an incredible flat torque curve, and the engine is happy trundling along uphill in 4th gear at 1,800 RPM or screaming at 6,500 RPM. The incredible amount of torque makes it effortless to drive, and you literally rest your foot on the accelerator to maintain highway speed. The car has been driven in everything from 0 Celsius (32 Fahrenheit) winter weather to 35 Celsius (95 Fahrenheit) summer days, and is completely unbothered by either extreme. It has been driven in pouring rain in bumper-to-bumper traffic, commuted to work, and taken grocery shopping. In other words, driven like a regular car, and has performed extremely well.
 With heavy duty aluminum pushrods, stock cam gears, air filters and a early traditional Cal-Look single Quiet Pack muffler, the engine has a wonderful mellow growl while trundling along the road, and is not noisy or tiring. In fact, my wife and I can have conversations at normal levels while driving on the highway. Mash the accelerator pedal to the floor, however, and a deep, angry roar emanates from the engine bay that is worth every cent spent on the engine! The car has no radio, and doesn’t require one, as no recorded piece of music could sound that beautiful.
At the time of writing, the engine has covered 3,000 kms, and I couldn’t be happier with the combination. It has no “blow-by,” consumed no oil and compression is between 135 and 145 lbs in each cylinder, confirming that the rings and valves have seated properly. Average fuel economy has been 25 MPG (combined highway/city), which is consistent with the previous combination. Final jetting is 200 airs, 140 mains, and modified 110 idle jet holders with 50 idle jets. Spark plugs are a perfect tan/brown colour. As referenced earlier, total advance timing is 28 degrees with 93 US octane fuel.
The car was also taken to my “local” track (3 hours away) for a shakedown run. Fear of blowing the stock transmission (and mindful of the lengthy drive home), the car was gently launched at 2,500 RPM on skinny 165R 15 radials, resulting in a slow and easy 2.5 second 60 foot time. As soon as the car left the lights, however, it was clear that something was wrong, as the engine had no power and began to shudder, miss, and would barely rev, resulting in a 15.2 second ¼ mile time at 92.3 MPH. Fearing that I had caused some damage, I decided to call it a day. Subsequent investigation revealed that I had merely run the small 6-volt battery too low by idling in the staging lanes with the belt off. It was a cool fall day, and I wanted to get some heat in the heads and oil prior to making a pass on the new combination. Lesson learned.
Another issue that surfaced during the shakedown run was that I would need to purchase a breather box. During the first 80,000 kms (50,000 miles) of the engine’s life, it never required one. But the higher piston speed due to the longer crank (82 mm vs. 78.4 mm) and much faster acceleration rates created more pressure inside the crankcase. An NOS early Berg breather box was subsequently purchased and attached to the valve covers using VW breather hose.
What the shakedown pass did reveal, however, is that the engine makes power! 92.3 MPH during a gentle test run with an engine running extremely poorly gives a sense of the tremendous potential this combination has. Based on the experience of others with similar combinations, the car should be capable of running mid-to-high 13s on radial tires with stock gears.
 I’ve only experienced two minor problems to date. The first problem that surfaced was minor leaks from each valve cover and the Berg breather box. Nothing that would drip on the driveway, but enough that it was still annoying. Resealing the gaskets on the valve covers did not solve the problem. Believing that the valve covers were warped, they were replaced with another set of vented VW valve covers, which seems to have solved the problem. The Berg breather box was removed and resealed, which also appears to have addressed the issue.
The other problem occurred when the engine began to run rough. The problem was eventually traced to the carburetor pump jet bolt for the #2 cylinder. Accelerator nozzles on early IDAs are held in place with a hollow threaded bolt containing a check-valve, which is held in place by a pressed-in plug (refer to photo #8). The plug had come lose, permitting the check valve to blow out the top of the hollow bolt, followed by fuel. Replacing the pump jet bolt was an easy, inexpensive fix.
The only thing I plan to try is a colder set of spark plugs. By changing to a set of NGK BCPR6ES plugs, which are one step colder than the stock heat range plugs, it is hoped that the total timing advance can be increased from 28 degrees to approximately 30-32 degrees without detonation, hopefully resulting in a bit more power
Closing Thoughts
While this is a great combination for the street, there is still much more horsepower available on pump gas. While the engine has not been dyno’ed, based on studying dyno charts with similar combinations, I would conservatively estimate that the engine produces 150 HP (at the flywheel) with the fan belt on. Want to go faster? Replace the 37 mm venturies with 40mm units, add an 1 5/8″ header and 2.5″ Dynomax “turbo” type muffler and you will easily gain 15-20 horsepower. Add slicks and a close-ratio transmission and the car would run 12-second ¼ mile times at over 100 MPH all day long. The state of tune is up to you and your intended use for the car.
Building an engine like this is not cheap, and will cost several thousand dollars, depending on your needs and existing parts. Engines making 3-4 times the horsepower of stock can easily break parts, so it’s important do your research and not cut corners. That being said, based on the experience of the previous combination prior to the changes, it is not anticipated that this engine will require any more maintenance than stock; essentially, oil and filter changes accompanied by a valve adjustment every 5,000 kms. We’ll pray to the VW gods for another happy, healthy 80,000 kms together.
